Aging Terracotta Pots With P.S. I Made This
If you haven’t noticed, I’ve really gotten into all things gardening and growing over the last year. From peas to pumpkins and flowers, It’s been so fun learning how to grow my own food and maintaining a home garden. One of my favorite parts of gardening, besides growing my plants, is creating an aesthetically pleasing space for them. I wanted to spruce up my deck and garden area, so I asked my friend Erica Domesek, design and style expert and founder of P.S. – I Made This, to help me recreate the look of vintage terracotta pots. I didn’t want to use paint, since I plan to grow edible plants, and was concerned about paint’s toxicity. Luckily, Erica had a solution in mind. It’s surprisingly easy, and the effect gave my terracotta pot such a soft and natural weathered look. To watch Erica and I make our own DIY aged terracotta pots, watch the video below. If you’re looking for step-by-step instructions as well, keep scrolling after the video for more. Let’s get crafty…
Here’s what you’ll need:
- Garden Lime
- Terracotta Pot (we used a 12-inch today)
- Paintbrush or foam brush (I prefer a large paint brush)
- Sandpaper
- Water
Notes
- Garden lime helps with acidity and pH of your soil. However, be aware of what you’re potting—edible plants can be affected, so do your research on what plants can be used with garden lime.
- Do not do this inside your house. I’d also recommend using a mask and goggles if you have sensitive sinuses.
Instructions
- Use a workspace that you are not planning to eat on and cover your surface for easy cleanup. Pour a little bit of garden lime and water into a bowl or vessel. We used a 1:1 ratio of garden lime and water, so, for example, if you’re using one cup of garden lime, use one cup of water.
- Stir it up. You want to create a paste. A lot of sediment will fall to the bottom of your bowl so make sure to keep mixing, however, not all of the sediment will completely mix, and that’s okay.
- The thinner your mixture and layers are, the lighter your terracotta wash will be, and the thicker and heavier your layers are, the darker your wash will turn out. Once you’ve finished mixing your paste, you can begin painting the mixture on your terracotta pot.
- Paint the mixture onto your terracotta pot. Now, depending on the effect you’d like, you can paint on the mixture in different ways. In the video, I did smooth strokes all around my pot for a lighter wash, however Erica used a foam brush and added the mixture on in small segments and added little clumps for a chunkier, aged, and rustic finish.
- It’s important to note that the mixture will dry pretty quickly, especially your first layer, so continue to add on more layers until the color and finish is to your liking.
- If your mixture starts to show drip lines in certain areas, don’t worry, just take more of the mixture and paint over those drip lines to cover them up.
- You’ll need to paint the top lip of the pot as well, since whatever plant you’ll be adding will still show a little of the pot’s insides.
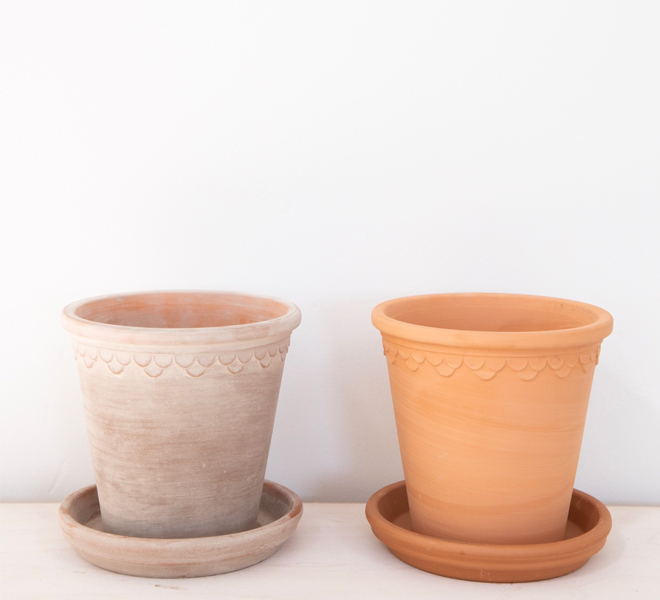
- Once you’ve added your lime mixture onto the pot, you can begin sanding your pot. There are a variety of sandpaper grits available. I had sandpaper with a coarse grit on hand, however if you’re not sure what to get, any type of sandpaper should work. Make sure you’re paying attention when you’re sanding, as you don’t want scratch lines to show on your pot. Start soft and small and check your work as you go along to make sure your pot has the look and feel you’re going for. I kept my wash pretty light and subdued, so I didn’t sand mine down, however, if you want yours to look more aged like Erica’s, take some more time to sand it down and have a little pop of terracotta coming through.
Design tip: Cluster your terracotta pots together. It makes the effect so beautiful!
Will you try Erica’s DIY terracotta aging method?
That’s it! I hope you enjoyed our little video, and try out this method at home. It’s a fun and easy way to add more character to your terracotta pots and garden.
To view more of Erica’s work on P.S. – I Made This, head to her website here and Instagram page here.
XO Lauren
Photos: Lauren Conrad
Affiliate links may have been used in this post.
