Inspired Idea: DIY Gold Ring Wall Hanging
Then, last month, I decided to take matters into my own hands. I’d been seeing various macramé and yarn wall hangings all over Pinterest and Instagram lately, but none of them quite suited my taste. So instead of buying one, I decided to make one. I love how my DIY wall hanging turned out because it makes quite a statement (and covers quite a bit of wall space), but it was so easy and inexpensive to make. Plus, there’s nothing I love more than a DIY home décor project since it combines two of my greatest obsessions: crafting and interior design.
Check out the tutorial below…
Here’s What You Will Need:
- metal macramé ring (I used the 18-inch ring, which makes a great larger, statement piece)
- yarn of your choice
- scissors
Here’s How to Make One:
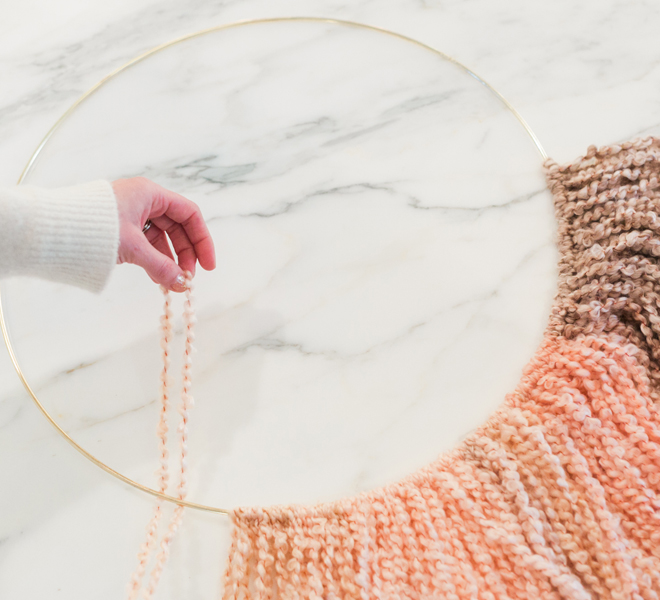
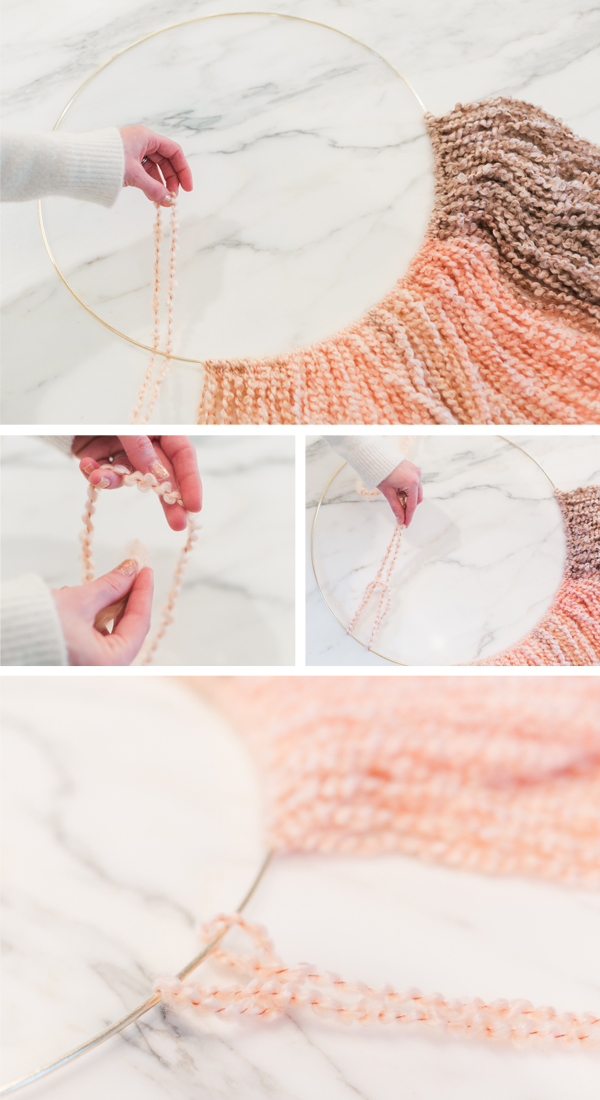
- Start by pre-cutting a bunch of pieces of yarn double the length that you want it to hang down (ie. if you want 2-foot fringe, cut 4-foot pieces). You can always cut more pieces later on if you find you need them, but it’s nice to get this step out of the way at the beginning.
- With the metal ring set out in front of you, fold one of the pieces of yarn in half, creating a loop at the top. Holding that loop behind the gold ring, thread the bottom ends of the yarn up over the ring and through the loop. Pull it tight.
- Continue looping the pieces of yarn onto the ring, moving in the same direction.
- Once you have enough yarn on your ring, trim the ends into an even V-formation (you could also trim the ends flat or into an arc if you prefer).
- Hang on the wall, and don’t forget to snap a photo for Instagram and tag us at @laurenconrad_com!
This DIY is so simple, it’s almost silly! The key is choosing a yarn with an interesting color and texture. They yarn I used faded from one color to the next, so I was able to achieve that ombre effect you see on the wall hanging without so much as switching skeins. I also love the thick wooly texture of the yarn I used. However, feel free to experiment with any colors and textures you please. You could even switch between several different types of yarn with varying colors and textures.
Are you going to give this DIY a try?
It would make a great housewarming or baby shower gift too (think how cute it would be in a nursery)!
xo Ilana
Team LC
